

Home › Forum › Ask A Member › Thx for your replies with helping to set points gap
- This topic has 5 replies, 4 voices, and was last updated 1 month, 2 weeks ago by
Don.
-
AuthorPosts
-
September 21, 2026 at 3:39 pm #328872
So after putting some fuel into each cylinder, my 1966 5hp evinrude did start. It does have the old points not the new BRP points. So now I will try using the choke and fuel tank. I did rebuild the carb. It was leaking badly from the bowl. If it doesn’t start now, I will investigate the fuel delivery issue. I am disappointed with my new BRP points. Not sure why I cannot gap them. I will try everyone’s suggestions if I have to remove that aggravating flywheel again. Took about 8 hours of bending gear puller bolts and using a 5 lb hammer to get it off. Wow
September 21, 2026 at 6:59 pm #328886post side by side pics of new and old point if you can … if they don’t open they are physically different !
btw take care of that hard to find $$$ expensive left hand prop. !!
btw if you plan servicing your oldy you may want to download this free bible your 1966 5hp may not be in the book but that 5hp is not much different than the CD version. Ignition wise mags are pretty well all the same anyway
https://www.socalaomci.com/library/johnson_service_manual_10th_edition.pdf
Joining AOMCI has priviledges 🙂
September 22, 2026 at 9:20 am #328910So after putting some fuel into each cylinder, my 1966 5hp evinrude did start. It does have the old points not the new BRP points. So now I will try using the choke and fuel tank. I did rebuild the carb. It was leaking badly from the bowl. If it doesn’t start now, I will investigate the fuel delivery issue. I am disappointed with my new BRP points. Not sure why I cannot gap them. I will try everyone’s suggestions if I have to remove that aggravating flywheel again. Took about 8 hours of bending gear puller bolts and using a 5 lb hammer to get it off. Wow
OK, you really need the OMC flywheel puller kit for this. Using the wrong puller can damage parts and cause injury….
September 22, 2026 at 2:37 pm #328917OMC OEM Is best but these work fine harmonic pullers
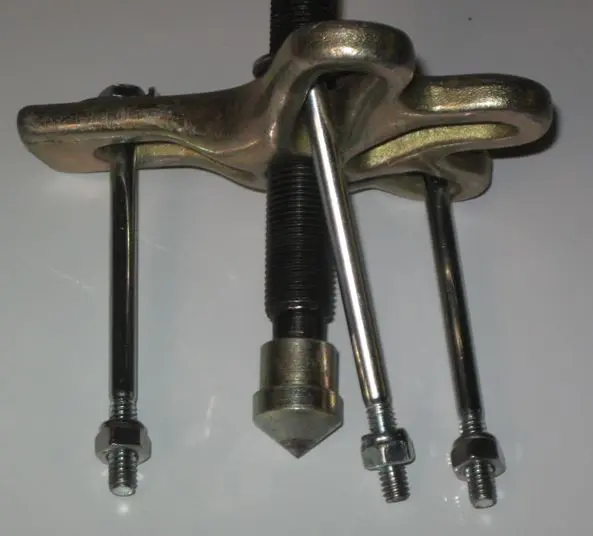
notice the inverted nylon nuts .. they make sure the bolt are not inserted to deep in the FW so as to hit coils and parts.. but just enough.
They also keep the bolts in place so you don’t loose them 🙂 that pointy tip is held by a oring… carefull not to loose the tip !!
Joining AOMCI has priviledges 🙂
September 23, 2026 at 11:34 am #328946I’d be surprised if removing the flywheel this second time will be challenging. If you torqued it down properly after removing it initially….I bet it will remove easily this time. Flywheel torque is important. Not too loose or too tight.
Electric or pneumatic impact tools should not be used to tighten flywheel nuts. Maybe someone here can provide the OP with the correct torque for his model motor.
September 23, 2026 at 11:37 am #328948I’d be surprised if removing the flywheel this second time will be challenging. If you torqued it down properly after removing it initially….I bet it will remove easily this time. Flywheel torque is important. Not too loose or too tight.
Electric or pneumatic impact tools should not be used to tighten flywheel nuts. Maybe someone here can provide the OP with the correct torque for his model motor.
Yes indeed, avoid impact guns for sure when retorquing the flywheel. But, the guns can be useful for removing the nut, or tightening the OMC puller.
-
AuthorPosts


- You must be logged in to reply to this topic.