

Home › Forum › Ask A Member › 1975 Evinrude Mate › Re: 1975 Evinrude Mate

105 psi is ok. They kind of like 110 to 120psi, but that being said 105 is not bad. Put two ounces of seafoam or Evinrude tuner per tank with the correct fuel mix 50:1. Premix your fuel and oil in a container then add the seafoam or Evinrude/BRP engine tuner. Mix well and then pour it into your motor’s tank. This will decarb your pistons rings from slug and coking that can prevent them from sealing properly. Long periods of low trolling and long periods of setting up can cause coking and limit ring functioning. The Seafoam or Engine Turner will decarbonize or removed the coked up carbon on the ring and powerhead. This may improve compression if compression was limited due coking of the piston rings.
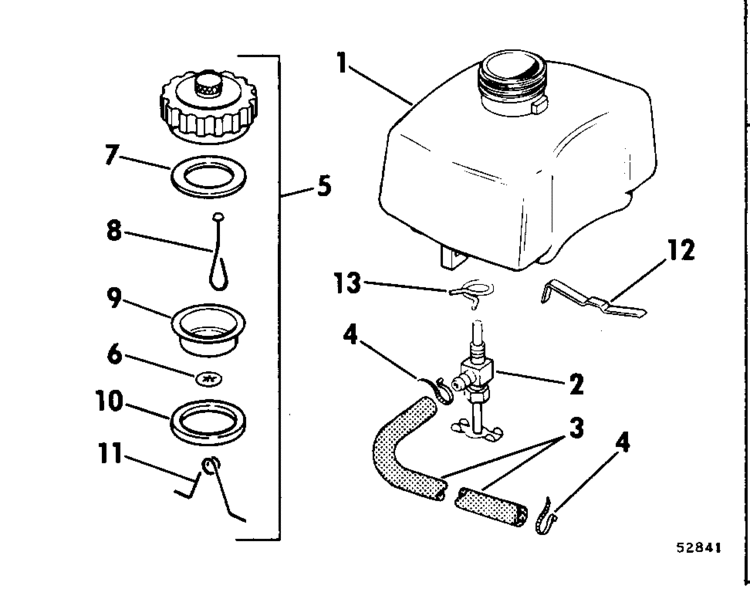
Make sure your motors tank is clean. Fuel is gravity feed to the carburetor, so sluge in the line can affect delivery as well as an in line fuel filter that is partially occluded. Part 2 in the diagram may need to be cleaned or replaced. Sometimes people place a filter in between the shut off valve and the carburetor. Combination of the filter at the shutoff valve and another filter inline can cause additional restriction of fuel.
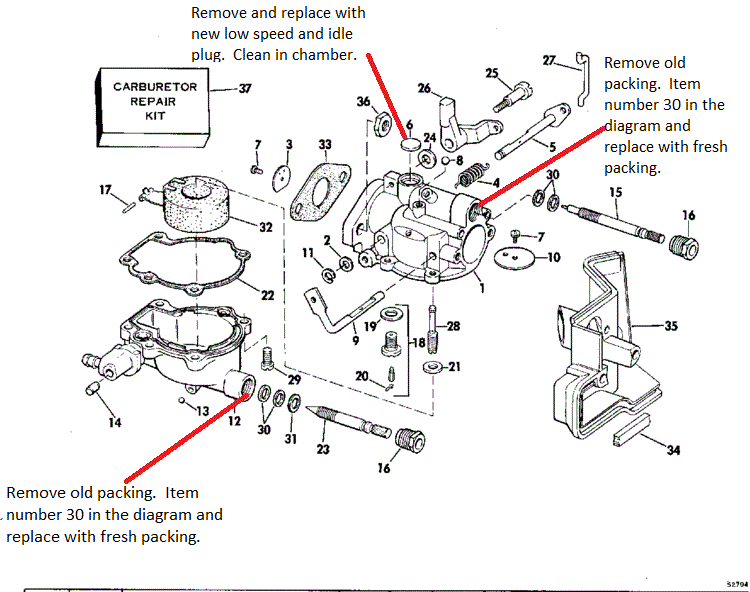
I know you stated that you clean your carburetor and I believe you. When you are servicing your carburetor there are somethings that people neglect to do.
1st. Did you completely remove and replace the old packing from the low and high speed circuits? Look at diagram part numbers 30. The packing breakdown and becomes worn over time. If you do not have fresh packing, then air can be introduced in the circuit. The packing along with the compression nut item #16 on the low and high speed needle help seal air from entering the circuits and also prevent the needle from wandering (turning during operation) once the motor has been dialed in properly.
You will need to take paper clip or a small flat tip screw driver to carefully remove the old packing. Don’t damage the threads.
2nd. People forget to remove the welsh plug over the low idle circuit. Item number #6 in the diagram. Below that plug is a chamber that has 3 small hole at the bottom that can get gummed up and affect low speeds or idling. A new plug will be needed to reseal it.
3rd. Check the conditions of your low and high speed needles for damage or gouging. Previous owner or mechanics may have damaged the needles when trying to dial in the carburetor. Needle damage can affect your carburetor’s ability to efficiently mix fuel and air mixture and delivery. Damage can also occur to the needle orifices from needles be tightened to hard.
Setting for your carburetor:
Make sure these are your beginning carburetor settings:
These are going to be the initial settings for the carburetor for starting purposes. Your will later fine tune the settings.
Facing the carburetor you will notice (top) slow speed/idle knob and the (bottom) high speed needle and knob
– Top needle is your slow idle needle. You will gently turn in (clockwise) until the needle is gently seated..please don’t force. Once seated, you will turn out (counter clockwise) the slow idle needle 1 1/2 turns. Leave it there for the time being.
– Bottom needle is your high speed needle. You will gently turn in (clockwise) until the needle is gently seated..please don’t force. Once seated, you will turn out (counter clockwise) the slow idle needle 1 turn. Leave it there for the time being.
Initial settings are: Bottom high speed = seat gently (turn needle clockwise), then open 1 turn out(counter clockwise). Top slow speed = seat gently(turn needle clockwise), then open 1-1/2 turns out (counter clockwise.
Once you have adjusted the idle/slow speed needle and the high speed needles, then snug up/ tighten part numbers 16 and 16 with 7/16 open in wrench enough to feel resistance when you turn the needles, but not too much where it makes it very difficult to turn the needles by hand.
Setting the high and low needle valves properly:
NOTE: These settings should be done a large test barrel or on the boat in the water/lake!! It best to do these adjustment on the boat in the lake or on commercial size test tank. (You can damage your motor running it wide open in a small test barrel.)
(High Speed) Start engine (it will run pretty rough), shift into forward gear, take up to full throttle. In segments of 1/8 turn in (clockwise), waiting for the engine to respond between turns, start turning in the bottom high speed needle valve. You’ll reach a point whereas the engine will either start to die out or spit back (sounds like a mild backfire). At that point, back out (counter clockwise) the needle valve 1/4 turn. Within that 1/4 turn, you’ll find the smoothest setting.
(Low Speed) Slow the engine down to where it just stays running. Shift into neutral. Again in segments of 1/8 turn in (clockwise), start to turn the top needle valve in. Wait a few seconds for the engine to respond. As you turn the valve in, the rpms will increase. Lower the rpms again to where the engine will just stay running. Eventually you’ll hit the point where the engine wants to die out or it will spit back. Again, at that point, back out the valve 1/4 turn (counter clockwise). Within that 1/4 turn, you’ll find the smoothest slow speed setting.
When you have finished the above adjustments, you will have no reason to move them again unless the carburetor fouls/gums up from sitting, in which case you would be required to remove, clean, and rebuild the carburetor anyway.
Watch these videos, they are little long, but it will give you a good idea how to properly clean and evaluate your carburetor. The carburetor in the video does not have high speed needle, but the video with give you a good general idea. Sorry the 1st and 2nd video pertain to a 18hp and 6hp motors, so just scoot along until you get to the carburetor disassembly and cleaning.
Just jump to video 4
OMC fix jet carburetors part 1 of 10 (Motor displayed 1968 Johnson 6hp)
https://www.youtube.com/watch?v=7MmDOaOQyQg
OMC fix jet carburetors part 2 of 10 (Motor displayed 1968 Johnson 6hp)
https://www.youtube.com/watch?v=PuByx8J-EfY
OMC fix jet carburetors part 3 of 10 (Motor displayed 1968 Johnson 6hp)
https://www.youtube.com/watch?v=FpivbGEv0wM
OMC fix jet carburetors part 4 of 10 (Motor displayed 1968 Johnson 6hp)
https://www.youtube.com/watch?v=-aWICvsQZQ8
OMC fix jet carburetors part 5 of 10 (Motor displayed 1968 Johnson 6hp)
https://www.youtube.com/watch?v=JqB6PLqeTI4
OMC fix jet carburetors part 6 of 10 (Motor displayed 1968 Johnson 6hp)
https://www.youtube.com/watch?v=HS5J_AxJrAY
OMC fix jet carburetors part 7 of 10 (Motor displayed 1968 Johnson 6hp)
https://www.youtube.com/watch?v=Iq_2RfWjQ28
OMC fix jet carburetors part 8 of 10 (Motor displayed 1968 Johnson 6hp)
https://www.youtube.com/watch?v=-lXIVBX_UF4
OMC fix jet carburetors part 9 of 10 (Motor displayed 1968 Johnson 6hp)
https://www.youtube.com/watch?v=-nA_4YmNgt8
OMC fix jet carburetors part 10 of 10 (Motor displayed 1968 Johnson 6hp)